

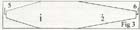
 I start by drawing the crankbait on a sheet op paper (fig1)
Then I copy it to a wooden board, preferably pear-wood or grenen-wood
(sort of pine) (fig1). Take a look at figure 1 to locate the holes you have to drill. Use a
drill-bit of 8mm in diameter (50mm from the each end of the lure).
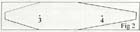
Take a look at figure 2 for the location of the holes you must drill
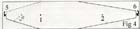
for the screw-eyes, using a drill-bit of 2mm diameter. Look at figure 3 to locate the location for the front and rear screw-eyes, use a drill-bit of 2mm diameter. You should drill to the point where the numbers 1 and 2 are shown.
Make a saw-cut to add the crankbait-lip using a wood-saw. You can vary
the angle you use for the lip (fig 4). Saw the cut 4mm thick and 20mm deep into
the lure. Saw the cut from the top (fig 2)
I start by drawing the crankbait on a sheet op paper (fig1)
Then I copy it to a wooden board, preferably pear-wood or grenen-wood
(sort of pine) (fig1). Take a look at figure 1 to locate the holes you have to drill. Use a
drill-bit of 8mm in diameter (50mm from the each end of the lure).
Take a look at figure 2 for the location of the holes you must drill
for the screw-eyes, using a drill-bit of 2mm diameter. Look at figure 3 to locate the location for the front and rear screw-eyes, use a drill-bit of 2mm diameter. You should drill to the point where the numbers 1 and 2 are shown.
Make a saw-cut to add the crankbait-lip using a wood-saw. You can vary
the angle you use for the lip (fig 4). Saw the cut 4mm thick and 20mm deep into
the lure. Saw the cut from the top (fig 2)
 Then saw from the sides (fig 1). Use a wood-file to create the rough shape by rounding the lure's body. Make it according to your own preferences.
Use a multi-tool (editor: for instance a dremel multi-tool) to fine-
tune the shape. Smoothen the surface with some sanding paper.
Use a chisel to make some groves along the length of the lure near the
numbers 3 and 4 (fig 2). Do this 1mm deep and 10mm deep
Bend 4 wire-eyes from stainless steel wire with a length of 50mm.
Stick the wire-eyes through the holes mentioned in step 4.
Then saw from the sides (fig 1). Use a wood-file to create the rough shape by rounding the lure's body. Make it according to your own preferences.
Use a multi-tool (editor: for instance a dremel multi-tool) to fine-
tune the shape. Smoothen the surface with some sanding paper.
Use a chisel to make some groves along the length of the lure near the
numbers 3 and 4 (fig 2). Do this 1mm deep and 10mm deep
Bend 4 wire-eyes from stainless steel wire with a length of 50mm.
Stick the wire-eyes through the holes mentioned in step 4.
 Bend the edges along the back of the lure. Add some epoxy-glue first to
fix. Shape a lip of 2mm thick plexi-glass and sized 25x50mm. Glued it in the
saw-cut with some epoxy-glue. Allow the glue to set and harden.
Bend the edges along the back of the lure. Add some epoxy-glue first to
fix. Shape a lip of 2mm thick plexi-glass and sized 25x50mm. Glued it in the
saw-cut with some epoxy-glue. Allow the glue to set and harden.
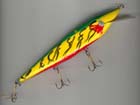
 Apply a basic coat of white primer. Paint the basic color (yellow for the crankbait in the picture). Apply your preferred pattern, using paint you can get at every DIY store.
Allow everything to fry thoroughly. Finish the crankbait with some boat-paint or other lacquer
Attach the splitrings and the trebles.
Apply a basic coat of white primer. Paint the basic color (yellow for the crankbait in the picture). Apply your preferred pattern, using paint you can get at every DIY store.
Allow everything to fry thoroughly. Finish the crankbait with some boat-paint or other lacquer
Attach the splitrings and the trebles.
Good luck from Arthur
P.S.: if the lip isn't positioned straight in the lure's body, you can heat the
plexi-glass and bend it in the right position