

"Perch" colorpattern
This color is well known and it is one of the most widely used color patterns for many types of lures. We will explain to you now how to paint this perch color pattern that is often referred to as “Natural Perch”. There are countless possible variations but for now we will explain this one variation. I will explain some other variations along the way. The final result depends on the personal preference of the lurebuilder who is painting this color pattern.
Necessary items:
- Yellow spray paint. So far I haven’t been able to find gloss yellow paint so I only use high gloss yellow paint.
- Black spray paint. I use gloss black paint.
- Green spray paint. There are dozens of shades of green for sale, and I use several shades of green myself. This shade of green is somewhat pale but I often use darker shades of green as well.
- Gold colored spray paint. I use a kind of car paint for wheels. This is a paler shade of gold but it shines very brightly in both clear and stained water.
- Mesh for spraying scales
- Laundry pegs/clippers
- 12mm Diameter stick-on eyes in the color “chartreuse”
- The perchbar stencil.
I use spray cans that are sold by a brand called “Motip”. This spray paint is available from most Belgian DIY stores. Abroad these spray cans are probably sold under different brand names. The stick-on eyes are available from Moore's Lures and John's Lures And Stuff.
The color pattern explained step by step
As usual we will start from a lure body that has been painted white. In this case it is an 8” glider jerkbait that I built.
The first thing that we need to do, is to paint the entire lure body yellow. Attach a screw-eye to the tail of the lure and add an S-shaped piece of wire to hang the lure on a line.
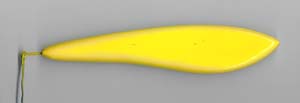 Shake the spray can with yellow paint for about a minute. Spray the paint in quick, short movements. Move from the tail (the lure hangs head down) towards the head of the lure blank. I work in two steps. First I move quickly over the entire surface of the lure blank. Don’t worry if the white paint is still visible. Then I wait about 5 minutes and then I shake the spray can again. I move over the entire lure blank again to cover any spots that may have been left uncovered after my first pass. Make sure that you don’t forget the tail end and the nose end. These spots are easily forgotten about because the lure hangs head down. Because I use high gloss paint, I need to wait at least 24 hours to allow the yellow paint to dry thoroughly before I can continue. Te be sure that the yellow paint ha thoroughly dried, I usually wait 36-48 hours before continuing. If you would spray a different color over the yellow within 24 hours, the paint will usually crackle and bubbles will start to appear on the surface. That s the biggest disadvantage to high gloss paint. (View picture 1)
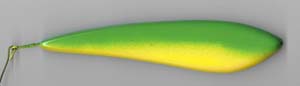 Next you take your spray can with green paint and you shake this can for about a minute. Hold the jerkbait in front of you, with the nose down, and spray green paint with quick movements on the upper halve of both sides of the jerkbait and on the back. Repeat this step, after a break of 10 minutes. The second step is necessary to make sure that you covered the yellow paint nicely with green paint. Don’t spray too much paint on the lure in one step because you will get drips and the paint may even begin to flow down the lure body. This must be avoided at all times, therefore I advise you in each and every color pattern to work in small steps, spraying a little bit of paint at a time and to move fast over the lure blanks. The picture will show you what I mean by painting the upper halve of the sides and the back. Whether you have sprayed a greater part of the sides in green paint, is of little importance. If the side of the jerkbait has been covered for about 90% in green paint, the perch pattern will look a bit darker in the water. If you have only sprayed a little bit of green paint on the sides, the perch pattern will look paler in the water. That’s just a matter of personal preference. Because I used high gloss green paint in this color pattern, I will wait another 36-48 hours before I continue. (View picture 2)
 In this next step we will paint the scales. I prefer to use gold paint in most color patterns but silver and copper paint give a nice finish as well. One of the crankbaits that Janne Ovaska, a good friend and also a member of this website, built for me, had copper scales in it. This color pattern just looked awesome! I won’t explain how to spray these scales into detail. I gladly refer to the other color patterns called “Roach” and “Walleye” that can be found on this website as well. There I already explained into detail how and why. Again, work with quick, short sprayshots when you move over both sides of the lure. Try to avoid spraying paint on the belly as much as you can. This works best when you spray the gold paint on the sides at an angle, spraying from the backside of the lure. Gold colored paint has usually dried after 10 minutes, so you can continue relatively fast on this color pattern from now on.
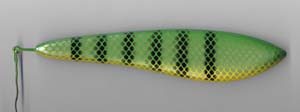
For this color pattern, leave the mesh and the laundry clippers attached to the lure body after having sprayed the gold scales. The reason for that is that we will now spray a different type of perch bars. So take your spray can wit black paint and shake it well for about 1 minute. Place the lure on a piece of old newspaper and position the perch bar stencil on one side of the lure. Make sure you divide the perch bars over the entire length of the lure but just a bit closer towards the tail than towards the head. The reason for that is that we will later spray a black head for this color pattern. Now paint the perch bars by moving your spray can from the back towards the belly side of the lure. Use quick, short spray shots to avoid spraying too much paint on the lure. If you do that, black paint will flow underneath the scales and you will end up with stains. By moving from the backside of the lure blank towards the belly side, you will avoid spraying black paint on the belly side.
This different perch bar pattern just looks nicer, more professional. That’s all there is to it. Now remove the stencil and hang the lure up to dry, including the mesh and laundry clippers. This usually doesn’t take longer than 10 minutes. When the black paint has dried, remove the clippers and the mesh carefully. (View picture 3 for the result)
 An alternative is to spray the perch bars in full. To do that, just remove the mesh and the laundry clippers after you have sprayed the golden scales. Position the perch bar stencil in the same was that you would for the “special” perch bars and use the same spraying technique. In this case, you will more clearly see what the advantage is of spraying from the backside towards the belly side. You can expect to see very little or no black paint on the belly side.
Of course you aren’t obliged to paint the perch bars vertically. You can position your perch bar stencil at an angle of 30-40° towards the tail. This way you’ll get perch bars that point backwards at an angle. It looks nice.
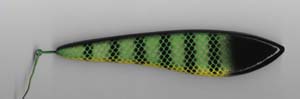
All that now remains to be done, is to spray the head and the back black. We will start with spraying the head black. Shake the spray can with black paint for about a minute and hold the lure blank in front of you with one side facing up. Then spray black paint on the head while moving the spray can at about 4-5” above the surface of the lure blank. Move quickly over the surface and repeat this step after a 5-minute wait. This way you will get a nice black head on one side. Make sure you don’t spray too much black paint on the head and paint the head about 4-5cm wide. This is in case of a 20cm long lure. Repeat this step on the other side. Now continue to paint the head black both on the belly side and the backside. The result is a nice black head that really catches your eye.
Hold the jerkbait in front of you and spray the back black in several steps. Make sure your jerkbait doesn’t move at the time you are spraying the black paint. If you move it, you will be experience “overspray” Now what is “overspray”? Well, that’s quite easy. If you move the jerkbait when you are spraying the black paint on the backside of the lure, black paint will also end up on both sides. This will make the colors duller and it will make the lure look less good. For instance, the gold scales will create a lot less flash when they are covered with small, black paint spots. So try to avoid this. (View picture 4)
 Now, after a drying period of 10-15 minutes, apply the stick-on eyes. Gloss black paint has a limited drying period. If you are uncertain whether the black paint has dried thoroughly, wait a little while longer. Don’t take any chances at this stage. Before you know if your fingerprint will be all over the black paint and it’s near impossible to get rid of them. (View picture 5)
Some alternatives are:
- Don’t spray the black head but just apply the stick-on eyes. Spraying the head takes some practice. And believe me, there is no law that states you should apply the stick-on eyes at exactly the same spot as I did. Position them where you like them to be.
- Don’t spray the belly side with yellow paint but leave it white. It gives a nice result but it’s a little more difficult to spray. The yellow paint can easily end up on the belly side because of the vapors of the spray can.
- Try using fluorescent chartreuse and fluorescent green instead of plain yellow and plain green. These two colors give the perch pattern a paler but brighter look. I prefer to paint silver scales for this alternative version.
- Try spraying a red or a fluorescent orange throat instead of the black head.
- Try spraying the entire belly in fluorescent orange paint or red paint.
As you can see, there are countless possible variations. If there should be some requests to explain one or more of these variations on this website, please feel free to ask us. I’m thinking about the fluorescent perch pattern, for instance. You can ask us on the forum. Good luck with spraying this color pattern!